Patterned Paper Tutorial #1
Using & Mixing
I have always had difficulty in using Patterned Papers until I attended the CK Convention in Charlotte, NC and was fortunate enough to attend a class on using the beautiful Printed Papers Collection by Vickie Shepherd. The actual full name of the class was "A little goes a long way." It really does!
We also have added another
Tutorial #2 for using Patterned Paper
here.
My difficulty in using patterned scrapbook paper comes from several things. First, if it's really pretty, I hate to cover it with photos. Second, if it's really busy paper, I am afraid to put photos on it as I don't want to detract from the photos. Third, I have never been able to mix or use multiple patterns in my paper choices which stems from old images of the "tourist with plaid shorts and hawaiian shirt." So I felt very lucky that I was able to get into this class.
Vickie Shepherd was an awesome instructor and the beautiful papers she provided in the kits were her designs, so I am eagerly awaiting the arrival of more of this particular collection so I can keep practicing mixing and matching of patterned papers. By the way, another plus for these gorgeous papers -- they were double-sided papers.
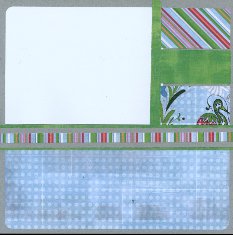
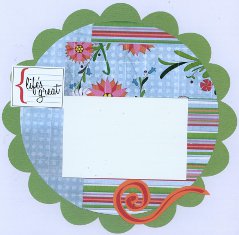
These first two layouts for the paper tutorial uses 3 different patterns, but with matching colors.
* A light blue paper with 1/4 white dots.
* A green, orange and floral with peacocks on the light blue background. (The reverse of the blue with white dots.)
* A striped paper using all the colors in the above 2 papers with a beautiful green linen pattern on the reverse.
The layout on the left uses a gray background paper with the bottom half the light blue with white dots. On top of that is a strip of the green, another smaller gray strip, then a 1/2 inch strip of the stripes on top of that. The white section in the upper left is a large photo matte to handle 2, 3 or 4 photos cut to fit inside the white matte. The section to the right of the white photo matte is smaller pieces of the floral, striped and linen papers with the stripes cut on an angle. The flower on the right was made from ribbons matching the paper colors.
The page on the left was done from another class using some of the same paper. It was originally on a dark green background, but I moved it to a white background - will move it again if I can find the same gray as on the left layout. It uses the green scalloped circle, filled with sections of the three patterned papers cut to fill the circle. The white matte indicates where the photo would go. The swirl and the "Life's Great" journaling card came with the page kit.
Scrapbook Tip for Patterned Papers: Another great tip for using papers with different patterns, put your photos close together on the same solid color photo matte.
Scrapbook Tip for Patterned Papers: Try to use papers all from the same collection to match up the colors.
----------------------------------------------
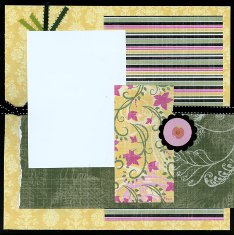
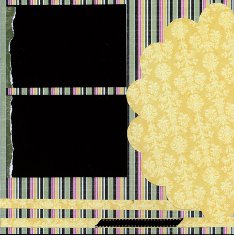
These next 2 layouts in the paper tutorial actually use 4 different patterns, but again, they are all from the same collection.
* A subtle yellow and white Floral for background.
* A subtle green with white Floral outlined images.
* A Strip paper using green, pink, yellow, and black.
* A yellow Floral paper using the same green, pink, yellow and black for the vines and flowers.
The layout on the left was from the kit, and is perfect for highlighting a single photo on the white matte. The yellow floral background is trimmed 1/2 off 2 sides to fit onto the black background card stock which accents the black in the striped paper and the black ribbon. The green Floral is torn on the one edge and topped with a small piece of the overall floral and accented with a black scalloped circle with pink floral center and brad.
The layout on the right is my design using some leftover papers from the left page. The yellow ribbon strips on the bottom were the areas cut from the left page to allow the black background to show. A piece of the black ribbon was added to the paper ribbon strip. The edges of the black mattes were accented with more of the torn green floral paper. Another photo will be placed in the yellow 1/2 scalloped circle.
Scrapbook Tip for Patterned Papers: Use patterns with subtle designs blend easier with one another. Use both the bold and subtle designs together.
----------------------------------------------
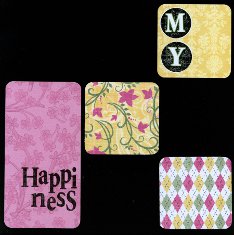
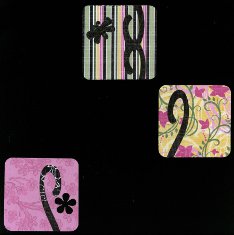
This next set of 2 layouts in the paper tutorial actually uses 5 different paper patterns, but again, they are all from the same collection.
* The subtle yellow and white Floral for background from above.
* A subtle pink floral background.
* A Strip paper using green, pink, yellow, and black from above.
* A yellow Floral paper using the same green, pink, yellow and black for the vines and flowers from above.
* A fifth Argyle pattern using the green, pink, yellow and black.
These two pages use a color blocking method which essentially divided the paper into 9 sections, each 4 inches wide. To fill the sections with the patterned paper, each square was cut 3 & 3/4 inch square. The larger paper was cut 3 & 3/4 x 7 & 1/2. Each patterned piece was cut with a corner rounder, which makes it much easier to place the pieces with a 1/4 inch wide space. Some of the pieces were decorated with black flourishes and cut outs to match the black background.
Scrapbook Tip for Patterned Papers: Putting space and a solid color between the Papers keeps the patterns from running together. For this type of layout, you will have space for 3 horizontal photos and 4 square pictures cut and matted to fit the black spaces.
----------------------------------------------
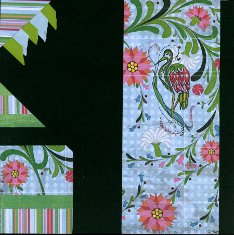
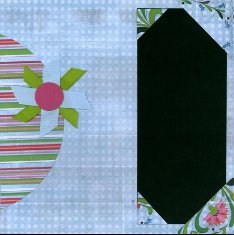
These final two layouts were my own designs, using the leftover pieces of this lovely Paper which does go a long way.
The layout on the left on a background of dark green uses a large section of the floral with the peacock, and will be a title page with the title cut from a matching solid green card stock and the remaining green and blue ribbons attached to a corner piece. Striped pieces of the patterned paper adorn an angled piece on the left.
The layout on the right uses a dark green card stock adhered with corners made of the patterned paper. This will be used for a journaling block in white pen. The flower was made with matching green and blue ribbons, adhered to a partial circular striped pattern. All was backed with the light blue with white dots.
Scrapbook Tip for Patterned Papers: Patterned Papers go a long way, if using them in small portions, so you get to enjoy their beauty in more layouts. This is a great use for using up your scraps, and also for making your greeting cards.
Check out our Patterned Paper Tutorial #2
using a different paper collection.
the Tutorial Page for more Scrapbook Tutorials.
Check out the Quick Start Guide for scrapbooking for beginners Picking your Papers.
Home Page for general scrapbook advice.


